Browsing Tag

Gluten-free

Food

Brownie bliss balls (guilt-, gluten- & sugar-free!)

27. 3. 2015

IMG_6629

I have a very simple recipe for you today! I’ve been craving, let’s say it in French so it looks more sophisticated: patisserie, or anything sweet and chocolatey for the whole week. I was adding coconut sugar to everything, but I needed something more. This recipe includes chocolate and walnuts, but it’s not a brownie: these are brownie bliss balls! They are so satisfying, I ate three and now I feel I have enough for a few … hours :D And you need only three ingredients, isn’t it just amazing?

What you’ll need for around 20 brownie bliss balls:

1 1/2 cups raw walnut halves    1/2 cup raw cacao powder    15 dried apricots

First, grind walnuts in a food processor. Then add apricots and cocoa powder and blend again. Raw cacao powder is much healthier from the roasted cacao powder – it’s rich in minerals and antioxidants, to mention just a few. Otherwise just use cocoa powder.

So, now you have a bowl of sticky, but delicious dough in front of you. Roll up your sleeves and start making dem’ balls! (But don’t forget to wash your hands first :P). This amount will make around 20 medium-sized balls, but you can always double the ingredients to make more.

When the balls are done, roll them in cacao to make them look like truffles ;)

IMG_6561

IMG_6586

IMG_6630

I couldn’t believe it, but this dessert is the least messy so far and I made everything in less than 20 minutes, so it’s perfect if you’re in a hurry. And there’s no additional sugar besides the natural ones in the apricots. I really thought these would be very sweet, but it seems the apricots aren’t that sweet after all. You can add some honey or coconut sugar if you have a sweet tooth ;)

Take care 

Vesna

Food

Spaghetti, Caramelized Onions & Olive Oil

15. 1. 2015

img_5368

This recipe is for all onion lovers out there. I love pasta in every shape and form and it’s not surprising that I crave it every time I’m extremely hungry. I know there are so many healthier options, but you can’t resist every single time! And I didn’t even plan doing this post at first. But this dish is insanely simple, the only boring part is for the onions to caramelize – but it’s so rewarding at the end! For 2 people you’ll need:

corn/rice/regular spaghetti    2–3 large onions    4 tbsp olive oil    salt

Parmesan cheese  ♥  parsley

The first thing to do is to peel the onions, cut them in halves and slice them up. Then heat olive oil in a pan and add the onions. The most important part is to give them time, around 20 minutes or even more. In addition, you have to caramelize on low heat or they will get burned (and we don’t want that!). Don’t forget to stir occasionally and add some salt in the end.

When the onions start to get golden brown, bring water to boil, add some salt and your preferable type of pasta, it doesn’t have to be spaghetti. Cook it according to the directions on the package. When it’s done, drain the pasta and transfer it to the pan with onions. Mix it thoroughly and they’re ready to serve! Please, don’t forget to sprinkle it with Parmesan cheese as I did, it gives an extra something to the dish! And a parsley leaf on the top is, of course, obligatory. Bon appétit! :)

img_5346

img_5364

img_5367

Take care ♥

Vesna

Food

The Cookie update & Blueberry cookie dip

28. 12. 2014

img_5019

I promised to keep you posted about my attempts to make cookies with cookie cutters from the recipe I posted two weeks ago. I am happy to announce that they were a great success! I just added two additional tablespoons of rice flour to the original recipe, otherwise I followed it to a t. After you take the dough out of the frige, take a handful of dough and roll it out between two pieces of parchment paper 0,5 cm thick. Take any shape of the cutters and start creating! Cover a baking tray with another piece of parchment paper and place the cookies 1–2 cm apart. Put into preheated oven on 170°C for around 15 minutes or less, the cookies are done when they get golden color.

img_4949

img_4957

img_5002

Blueberry dip

In the next step I should obviously decorate them with frosting, but since I don’t like to use sugar that much and I couldn’t find a quick recipe for a gluten-free and sugar-free frosting, I decided to make some sort of a dip – let’s be honest, plain cookies can get quite annoying at one point. ;) I chose blueberries, partially because I have them in the freezer (I’m lucky enough that they grow in the forests nearby, I can eat them throughout the whole year!), partially because this is my favorite all year round fruit. You’ll need:

2 cups frozen blueberries   2 tbsp water    8–10 drops of stevia / 2 tbsp coconut sugar

Mix the blueberries with two tablespoons of water and stevia or coconut sugar in a medium saucepan, Currently, I use the ste-zero stevia drops I found in Interspar, of course I had to get it because I haven’t seen it in any other shop in Slovenia so far, and I really like it.* Then bring to boil and leave it to cook for 10 minutes. Blend the blueberries with a hand blender and allow the sauce to cool slightly. Pour the dip in a cute bowl and serve along with some cookies!

*If you don’t like the taste of stevia, I would recommend you to use coconut sugar which has a yummy caramel taste!

img_5009

img_5043

The dip is both sweet and sour and perfectly complements the sweetness of the cookies. You can basically do the same with any kind of fruits. Just make sure you don’t eat this with your favorite white shirt because the blueberry pigment is insanely hard to remove! (Trust me, I did that mistake only once :D) And what is even better, you can use it as a jam the next day, it is definitely much healthier than the one you find in stores :) Take care ♥

Vesna

Food

Festive Christmas cookies!

14. 12. 2014

rsz_img_4340

If you don’t eat wheat, it is sometimes hard to resist sweets and cookies, especially at this time of the year. This is why I made myself some gluten-free cookies the other day! They were not enough sweet for some, but I loved them anyway. This recipe couldn’t be more simple, you need only 8 ingredients and I assure you, they’re so much fun to make! They may not look as presentable as the ones on Pinterest, but are still worth a try ;) You’ll need:

250 g butter    3–4 tbsp honey    3 eggs  ♥  250 g rice flour    200 g buckwheat flour

2 tsp baking powder  ♥  3 tbsp roasted coconut flour    cinnamon  ♥  walnuts (optional)

Melt the butter and mix it with eggs and honey in a bowl. Add some cinnamon, then coconut, rice and buckwheat flour and mix thoroughly. If the dough is too soft or sticky, you can add some more rice flour, but let me just remind you that the dough should be a bit sticky – it will go in the fridge for 20 minutes and will harden in the meantime anyway. When the consistency is right, cover the dough with a cloth and put it in the fridge for around 20 minutes.

 rsz_img_4204

rsz_1img_4208

When you take it out, you can start with the best part! Cover the baking tray with parchment paper and start making balls. There should be around three centimeters between them as they will grow during baking. I stuck some walnuts in one half of the cookies. I was concerned it would be too much, but it turned out pretty well!

Put the baking tray in a preheated oven (170°C) for 15–20 minutes. The cookies are done when they get golden brown. Because there is no wheat in them, they tend to crumble at start, but when they cool down, they’re just fine.

rsz_img_4220

rsz_img_4209

Aren’t they cute? :D Probably the best cookies I made in years, I just have to try to cut out some shapes the next time, I’ll keep you posted if they turn out to be good :) And I’ll probably take them with me everywhere I go, you never know when you’ll start craving some sweets! :) Take care,

Vesna

Food

Halloween Pumpkin Soup

30. 10. 2014

IMG_3016

Have you already done any Halloween carving? I sure have! I haven’t made a Halloween pumpkin though, but I rather cooked a soup. A real autumnal pumpkin soup! It is  very easy to make and I don’t believe anyone can find an excuse, especially if you have such beautiful pumpkins already at home. It is gluten-free and vegan, thus perfect if you have guests over lunch and you don’t know their preferences (or you can make it just for yourself). The recipe has two steps, the first one takes place in the oven, while the second one is done in a pot. You will see, both the smell and the taste are highly rewarding.

You’ll need:

1 medium hokkaido pumpkin    3 medium sized onions    salt, pepper  

1/2 apple    1 cm fresh ginger (optionally)    2 l water (or more)

IMG_2955

IMG_2958

First, wash the whole pumpkin − you never know where it was stored. Then, carve into half, scoop out all the seeds and cut again into 4 or 5 pieces. Cover a baking tray with parchment paper and put the pumpkin pieces on the tray. Peel the onions and add them to the baking tray. Add a bit of salt and pepper. Put in preheated oven on 200 °C for one hour…

IMG_2968

until it looks something like this! 

IMG_2974

When you take the tray out of the oven, let it cool for a few minutes, otherwise it will be difficult to skin off the pumpkin. This part is the longest and a bit messy, but it is so worth it! Anyway, it is much easier than peeling the skin before you put it in the oven. Then put everything into a pot and add 1/2 of a sliced apple and some fresh ginger if you want to make it more spicy. Add water and bring to the boil. Let it simmer for 15 minutes and then blend thoroughly. Cook for another 10 minutes and the soup is done!

Serve warm and add some pumpkin seeds and/or pumpkin oil. I added both ;) If you’re a bit more creative, you can create wonderful bats or other Halloween symbols, unfortunately I only managed to “draw” a pumpkin that actually looks like an apple :D 

IMG_3025

I hope you’ll have fun on Friday! I’ll be rocking in my PJs, possibly with a cup of hot wine… The best way of partying, if you ask me ;) Have a nice weekend ♥

Vesna
Food

Greek cheesecake

22. 9. 2014

rsz_img_2183

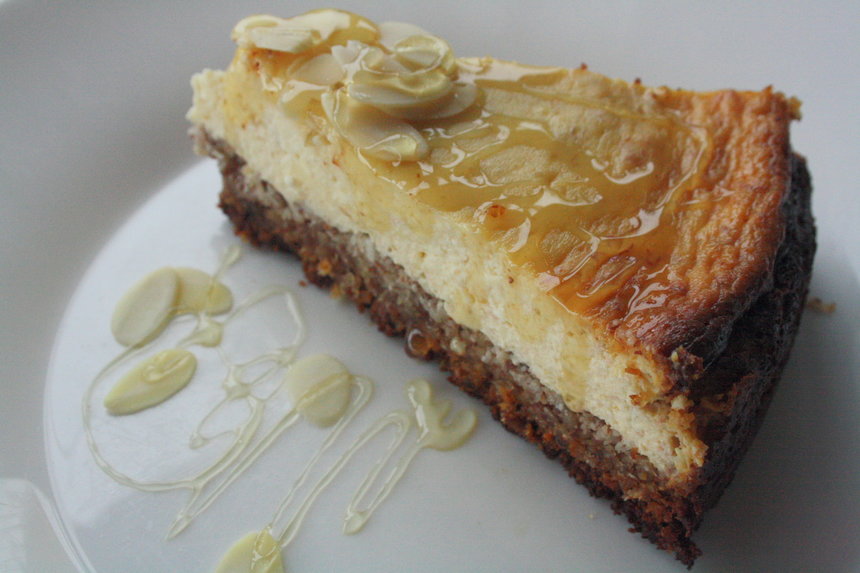
As I am still inspired by Greece and Greek cuisine, I decided to make a Greek cheesecake the other day and share the recipe with you. It was creamy, delicious, and just enough sweet, but I may have left it in the oven for a few minutes too long. Before we start, let me just say that I never count calories. If I did, I would probably feel bad and regret eating such a deliciousness. Now I don’t. ♥ But most importantly, it is gluten-free and sugar-free! Well, I cheated with honey, but it is completely natural and thus great to use. It is very similar to the blueberry cheesecake I made a while ago, but has some modifications. It is so easy to make that even those who never bake will want to try it ;)

rsz_img_2167

For the crust:

2 cups ground almonds    1 cup coconut flour    40 g butter    2 tbsp honey

For the filling:

500 g cottage cheese    1 cup sour cream    2 eggs    3 tbsp honey    2 ripe bananas

For the topping:

slivered almonds    some more honey

First, preheat the oven on 175 °C and spread some butter on a round baking pan (23 cm) to prevent the cheesecake from sticking to it.

Crust: Mix the almonds, coconut flour and honey in a bowl. Then add warm butter and mix thoroughly with your hands (yumm!). If he mixture is too thick/too watery, add some more butter/almond flour. Spread and press it on the baking pan and put in the oven until the cheesecake filling is finished.

Filling: In a bowl, mash the bananas and add all the remaining ingredients. Mix with a hand blender and pour the mixture on the crust in the baking pan. 

Put in a preheated oven (175 °C) for approximately 50 minutes. After it is done, leave it in the oven for another 10 minutes (unless it starts to get brown on the edges, like mine!). Let the cheesecake cool for a few hours. Then carefully place it on a cake stand, sprinkle with almonds and drizzle some honey on the top. Enjoy the magic ♥

rsz_img_2159

rsz_img_2158

rsz_img_2178

rsz_img_2169

Vesna

Food

Gluten-free granola

19. 8. 2014

rsz_img_0628

The time for the gluten-free homemade granola recipe has come. I always do it out of the ingredients that I already have at home, which makes them different every single time. The main ingredients are nuts and seeds, everything else is just optional. You can always add oatmeal, usually essential in granola. 

Tako, pa je prišel čas še za recept za domače brezglutenske muslije. Jaz jih vedno naredim iz sestavin, ki jih že imam doma, tako da so skoraj vsakič drugačni. Glavna sestavina so oreščki in semena, ostalo pa dodajam po želji. Seveda lahko dodate tudi ovsene kosmiče, ki so pri muslijih običajno nepogrešljivi. 

rsz_img_4162

We’ll need:

a package of slivered almonds    one cup of mixed seeds    one cup of coconut pieces and coconut flour   one tablespoon of flax seeds   one tablespoon of sesame    cinnamon    a big tablespoon of honey or two tablespoons of coconut sugar

Mix all the dry ingredients in a bowl and pour them on a baking tray covered with parchment paper. Warm up the coconut oil in a small bowl, add and dissolve honey or coconut sugar. Pour the mixture over the dry ingredients and mix thoroughly. Put in a preheated oven (180 °C) for 15 minutes. While baking, stir the mixture several times and watch out that all the parts are being baked equally. If you prefer a stronger flavor, leave them in the oven for a few extra minutes.

Potrebujemo:

paket narezanih mandljev    lonček mešanih semen    lonček kokosovih koščkov in kokosove moke  ♥  žlica lanenih semen  ♥  žlica sezama   velika žlica kokosovega olja    cimet    velika žlica medu ali dve žlici kokosovega sladkorja

Vse suhe sestavine zmešamo v posodi in stresemo na pekač, prekrit s peki papirjem. Nato v manjši posodi pogrejemo kokosovo olje, vmešamo med ali kokosov sladkor in počakamo, da se raztopi. Mešanico prelijemo čez suhe sestavine in dobro premešamo. Postavimo v vnaprej segreto pečico na 180 °C za 15 minut. Večkrat dobro premešamo in pazimo, da so vsi deli enako zapečeni. Če imate raje bolj močen okus, jih lahko v pečici pustite še nekaj minut.

rsz_img_4171

Granola with fruits and yogurt is great for breakfast and also make a great snack by themselves. I used to adore purchased granola all the time, but they cannot be compared to the homemade ones! In addition, we always know exactly what they contain, without unnecessary sweeteners and other additives. :)

Musliji so za zajtrk super z jogurtm in sadjem, za malico pa jih lahko grickamo kar same. Ko sem muslije še kupovala, so mi bili sicer zelo všeč, vendar  se glede okusa niti slučajno ne morajo kosati z doma narejenimi! Poleg tega pa res vemo kaj vsebujejo, brez nepotrebnih sladil in drugih dodatkov. :)

Vesna